How to Kickoff Product Discovery like a Pro
A step-by-step guide (with templates) to level up your Product Discovery
UPDATE: I’ve created a Miro template that you can use to workshop kicking off Product Discovery. Watch my walkthrough of the board in the video above.
A common question I get when I coach Product Managers is, "I know what I want to do discovery on, but how do I get started?"
Although there are many ways to start discovery, I have two tools that are my absolute go-to for kicking off and structuring Product Discovery.
They are:
Assumptions Mapping
Experiment Board (link to the template later)
Now a pre-requisite to all this is having a clear idea of the problem/opportunity you want to explore. If you're still unclear on that, it's best to spend time refining that first.
However, once you're ready to dive in, here is where I like to start.
Assumption Mapping
Whenever I'm doing discovery, it almost always starts with an Assumptions Mapping exercise.
Assumptions Mapping is from the Strategyzer book 'Testing Business Ideas'.
Those unfamiliar with Assumptions Mapping, it's a tool used to map and prioritize the assumptions you have around your chosen problem/opportunity area.
Assumptions can be:
Customer/User related — their behaviours, needs, motivations, etc
Technical — can we technically do this? Is it possible with this tech? etc
Business-related — is the business model sustainable? Will people pay for it? How much can we charge? etc.
or risk orientated — is this idea durable enough to survive changes in the future?
Also framed as testing the desirability, viability, feasibility and adaptability of the opportunity.
You can colour code or step through each of these lenses if you find it valuable to do so.
Personally, I like to keep things simple and just brainstorm all the assumptions we can think of.
From there, as the name suggests, we need to turn things into a 'map' — into a 2x2 matrix, to be more precise, like below.

Assumptions MapAn Assumptions Map comprises of two axes.
Along the x-axis is a spectrum from unknown to known.
This represents how much evidence we have on an assumption.
do we have existing research on it from past projects?
is there supporting data, or are we guessing?
are there indications that suggest this exists, or is it a gut feeling? We feel it's correct, but we do not have any data to support it.
The y-axis, on the other hand, is a scale of importance — from 'low importance’-to-‘high importance'.
This seeks to understand how vital the assumption is to the problem area, opportunity or solution.
is it integral to the idea?
if found to be incorrect, would that make the opportunity no longer worth exploring?
or is it not critical to the core idea?
I sometimes frame this as risk: It can make it easier for people new to assumptions mapping grasp the idea — i.e. high risk = high importance.
An example of importance might be, say, Uber's ability to show in real time where your ride is located. This is a great feature but if it wasn't technically possible to do it wouldn't be the end of Uber as a concept. However, the assumption that people are comfortable enough to get into a stranger's car, if that was found to be untrue, Uber's business model would crumble.
Therefore the latter would have a higher importance than the former.
Once you've mapped out your assumptions on the Assumption Map, your next step is to prioritize them.
Typically on an Assumptions Map, you want to invest your time in tackling the assumptions in the top-right corner first — the important and unknown assumptions.

Start with your riskiest assumptions in the top right.Testing your assumptions
The next step is to test your assumptions.
But for some, there is a missing step on how to transform these assumptions into actionable tests for discovery.
This is where the experiment board comes in.

The first step in the experiment board is to convert your assumptions into hypotheses.
This could be breaking an assumption down into a single hypothesis or into many. There doesn't need to be a 1:1 relationship between assumption-to-hypothesis; however, you should have at least one hypothesis for each assumption.
“We define a hypothesis as an assumption that is testable, precise and discrete.” — from Testing Business Ideas
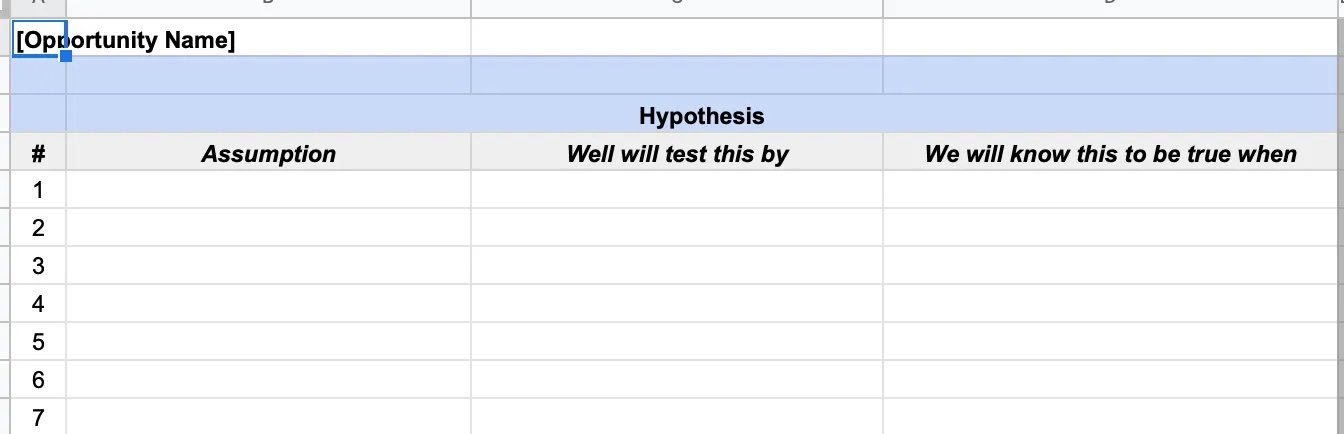
To facilitate converting your assumption into a testable hypothesis, we use the following format:
Well will test this by [experiment]
We will know this to be true when [measurable result]
Once you complete this step, you have essentially created what I like to refer to as an experiment backlog — a list of experiments that you would like to complete.
The final step is taking those experiments and turning them into a research plan — how are you going to execute them?
You will likely have a whole bunch of different experiments in there, from surveys, customer interviews, perhaps prototypes, gathering data, etc.
This step is all about organizing them into a logical sequence of events.
i.e. it may make sense to roll 2–3 hypotheses together, line up a round of customer interviews and build a discussion guide.
Bonus
You'll no doubt have noticed that there is a second half to the experiment board — this is where you can track your results.

The second half of the Experiment Board to capture and track your experiment resultsIt's designed this way to keep everything on one board for ease and traceability.
The second half of the template is where you can record your experiment findings.
Whether your experiment was True/False or inconclusive
What you learned?
What your next steps are?
Any notable quotes or notes from the experiment
And that's it. Rinse and repeat.
It's important to note that during this process you would have zoomed in to one or more assumptions, but that doesn't mean you have covered everything. You may need to go back to your Assumptions Map and pick off the next lot of assumptions that you want to test.
Further, not all your experiments will be conclusive. You'll no doubt learn new things, which will lead you to either create a new Assumptions Map based on new information or create a new hypothesis and test to more conclusively test your assumption.
I hope you found this useful. I'm building a self-paced online learning platform for product people called Product Pathways where I will be diving deeper into topics like this and providing more templates and tools — so if you found this useful, check it out!
🔗 Link to Experiment Board Template
🔗 Link to Discovery Plan Template
📚 Learn more in the Testing Business Ideas book
📣 FYI: If you got value form this, I’m also launching an online learning platform with deep dives into specific PM topics like this over at productpathways.com.
You can see what the courses will be like over on Product Pathways YouTube channel here, where I will be posting regular videos about Product Management.

Learn product online at ProductPathways.com and free on YouTube @ProductPathways.